
RANDOMIZER GUIDE
Introduction / Overview
Welcome to the Final Fantasy Randomizer guide! This guide is intended to help newer FFR players by compiling a variety of useful information for racers in a single place. If you have never played FFR before, I recommend reading A New A New Player’s Guide to Final Fantasy Randomizer Tournament #1 by ichbinmiah first. However, if you've played a few seeds and you're looking for ways to save some time, then read on!
Standard Classes
Final Fantasy allows you to choose a party of four from six different classes, each with unique strengths and weaknesses.
| Class Name | Description | Level 1 Stats | Level 25 Stats (avg.) | Class Upgrade |
|---|---|---|---|---|
| Fighter | Standard tank class with high HP and high strength. Can equip fairly strong weapons and armor. Best character to stand at the front of your party. As a damage dealer, he peaks earlier than the Black Belt but does not scale as well with additional levels. |
|
|
Knight |
| Thief |
Weak class with poor equipment pool, excels at running away and not much else. Can be made useful into the late game with spell casting items such as White Shirt (INV2) and Black Shirt (ICE2). Also useful as a meat shield in the front row of boss fights. The ability of the Thief to consistently run away is useful throughout the game but he does not need much experience gain to fulfill this role. If you are planning on grinding levels at any point (or running with a three-person party), killing the Thief beforehand is strongly advised. |
|
|
Ninja |
| Black Belt |
Damage dealer who starts out weak and becomes absurdly powerful at high levels (32+).
Has higher Magic Defense growth than any other class.
They have special rules regarding their attack and defense:
|
|
|
Master |
| Red Mage |
Incredibly versatile mage who can use both White and Black Magic. Can also equip light armor and a wide variety of swords. The ability of mages to buy spells is dependent on the "Magic Shops", "Magic Levels", and "Keep Permissions" flags in the randomizer program. For more information, please see this spreadsheet. |
|
|
Red Wizard |
| White Mage |
Specialist in recovery and defensive magic. Has slightly higher HP growth than the other mages, but cannot equip most armor. White Mages are the most reliable source of resurrection magic (LIFE, LIFE2). The ability of mages to buy spells is dependent on the "Magic Shops", "Magic Levels", and "Keep Permissions" flags in the randomizer program. For more information, please see this spreadsheet. |
|
|
White Wizard |
| Black Mage |
Specialist in attack and status magic. Very brittle, with low HP growth and a restrictive armor pool. Black Mages are the best source of magic damage, with access to several spells that damage all enemies. The ability of mages to buy spells is dependent on the "Magic Shops", "Magic Levels", and "Keep Permissions" flags in the randomizer program. For more information, please see this spreadsheet. |
|
|
Black Wizard |
Upgraded Classes
| Class Name | Description | Magic Permission | Upgrades From |
|---|---|---|---|
| Knight |
Powerful physical attacker with strong defense. Can equip the best armor and weapons in the game, and is able to learn some White Magic from levels 1, 2, and 3. |
White Magic (Lv. 1-3) | Fighter |
| Ninja |
Flexible physical attacker that can equip mid-range armor. Has access to high critical-hit rate weapons, but is still not as effective of a damage dealer as a Fighter or a leveled-up Black Belt. Can learn some Black Magic from levels 1, 2, 3, and 4. |
Black Magic (Lv. 1-4) | Thief |
| Master |
Functionally equivalent to a Black Belt. However, their Magic Defense grows only at +1 per level instead of the Black Belt's +3 per level. It is advisable to finish leveling your Black Belt before changing classes. |
None | Black Belt |
| Red Wizard |
Even more versatile than the Red Mage, with an improved magic, weapon, and armor pool. Gaining access to important spells (such as LIFE or LIFE2) is the most common motivation for upgrading a party with a Red Mage. |
Additional White and Black Magic Spells | Red Mage |
| White Wizard |
Similar to a White Mage but with access to all White Magic. Slightly improved armor and weapon pool. |
All White Magic | White Mage |
| Black Wizard |
Similar to a Black Mage but with access to all Black Magic. Can also equip the CatClaw weapon, but shouldn't be physically attacking during the late game. |
All Black Magic | Black Mage |
Class Selection
Always consider the randomizer's settings when making your class selections. Certain classes will be made more or less useful depending on the flags, which may impact your overall strategy.
| Flag | Tab | Impact |
|---|---|---|
| Keep Permissions | Scale |
If "Keep Permissions" is enabled, all mages are made worse. The most powerful spells (LIF2, CUR4, FADE, NUKE, EXIT) cannot be acquired until after the class change, and Red Mages are also prevented from learning LIFE and WARP. |
| Magic Shops | Scale |
If "Magic Shops" is enabled, mages are made worse initially as there is no guarantee that a Lv. 1 spell will available in Coneria. This usually evens out around the time you can access Elfland. |
| Enemy Stats | Scale |
The higher the Enemy Stats slider is set, the more likely it is that power-leveling will be required to complete the game. Mage-heavy parties are worse, as they are likely to go through their fixed spell casts much quicker to cover the same amount of ground. |
| Exp/Gold Boost | Scale |
Higher EXP multipliers incentivize power-leveling a single character. Higher values for the added EXP constant incentivize killing weak mobs with AOE spells. |
| Weapon Stats | Bug Fixes |
If "Weapon Stats" is off, weapons that grant bonus damage vs. a particular element or monster type will no longer provide that bonus. However, all weapons will now have higher critical hit rates. The extra damage potential is particularly noticeable on endgame weapons such as Masmune and Xcalber. This benefits Fighters the most, but mage-heavy parties can also benefit by stacking damage buffs on the Masmune holder. Black Belts are also more powerful with "Weapon Stats" off, as their critical hit rate is doubled. |
| Chance to Run | Bug Fixes |
If "Chance to Run" is off, the luck check during run attempts accesses the wrong location in memory. More detail can be found here, but the practical effect is that the first two characters can run quite reliably, the third is not likely, and the fourth almost always fails. With this setting off, Thieves have no value to your team. Avoid them at all cost. |
| Early Bridge | Scale |
With "Early Bridge" enabled, the bridge north of Coneria has already been built. This is a useful option if there are no AOE damage spells available in the Coneria magic shops - you can skip ToF and Garland until later. |
Gameplay and Routing
It is important to understand the items that are 100% required to complete the game. The general order you're likely to find them in the randomizer are:
- LUTE
- SHIP
- TNT
- FLOATER
- ROD
- BOTTLE → OXYALE
- CUBE
- CROWN → CRYSTAL → KEY
- SLAB → CHIME
Of these items, only 4 (TNT, FLOATER, CROWN, and SLAB) are randomly located in a chest somewhere in the game. Since TNT has to be located in the very beginning of the game due to the way the map is set up, it has limited locations it can be in. Therefore, you are often at a point where you're looking for both the CROWN and the SLAB to be in a position to complete the game (this is often called "GO-mode.")
The RUBY is an interesting item. It is required to pass the Titan in Titan's Cave to get to the ROD, and could be required to beat the game if the FLOATER is in the Titan's Cave or deep in ROD-locked Earth Cave. Keep this in mind if you find the RUBY early on, it could mean that dipping over to Earth Cave early could be a good play.
Keep in mind the difference between locations that you aren't required to go to vs. locations that you are. Ice Cave and Castle of Ordeals are two notable later-game locations that aren't required to beat the game, but could potentially contain a required item. This means that generally, you want to check the 4 Fiend required dungeons (Earth Cave, Gurgu Volcano, the Sea Shrine, and Mirage/Floating Castle) if possible before venturing to side locations.
Given all of this information, there is a general pattern one can take when starting this game:
- Kill Garland
- Get to Pravoka and get the SHIP
- Find the TNT and open up the map
- Go to Gurgu Volcano
There are many reasons the Volcano is often the first location checked after finding the TNT:
- Unlike the other Fiend dungeons, it can be completed without any extra key items.
- It has a good amount of chests (30)
- It contains an excellent place to grind levels (for more information, refer to the level grinding section)
Depending on what you find in the Volcano (RUBY, the FLOATER, or something else?) you can go from there. You can also take a gamble and check the first 3 floors of the Earth Cave early, or maybe check Ice Cave or Castle of Ordeals? That's the beauty of the randomizer, you can make a safe play, or gamble if you have to!
Chest Locations
| Location | Encounters? | # of Chests | Locked | Key Items Required |
|---|---|---|---|---|
| Temple of Fiends | Yes | 6 | 3 (Mystic Key) | None |
| Coneria Castle | No | 6 | 6 (Mystic Key) | None |
| Matoya's Cave | No | 3 | None | None |
| Dwarf Cave | No | 10 | 8 (Mystic Key) | Ship |
| Marsh Cave | Yes | 13 | 3 (Mystic Key) | Ship |
| Northwest Castle | No | 3 | 3 (Mystic Key) | Ship |
| Gurgu Volcano | Yes | 30 | 0 | Ship, Canoe |
| Ice Cave | Yes | 16 | 0 | Ship, Canoe |
| Castle of Ordeals | Yes | 9 | 0 | Ship, Canoe |
| Earth Cave | Yes | 24 | 8 (Rod) | Ship, Rod |
| Titan's Cave | Yes | 4 | 0 | Ship, Ruby OR Floater |
| Czardia Islands | No | 13 | 0 | Floater |
| Waterfall Cave | Yes | 6 | 0 | Canoe, Floater |
| Sea Shrine | Yes | 32 | 1 (Mystic Key) | Canoe, Floater, Oxyale |
| Mirage Tower | Yes | 18 | 0 | Floater, Chime |
| Floating Castle | Yes | 34 | 0 | Floater, Chime, Cube |
| Temple of Fiends (Past) | Yes | 7 | 7 (All Fiends, Key) | All Fiends Defeated |
Key Items
| Key Item | Description | Location | Required? |
|---|---|---|---|
| Adamant | Rare mineral ore. The blacksmith in the Dwarf cave can use this to create Xcalber. | Random Chest | No |
| Bottle | Fairy trapped in a bottle. When released, she will fly to the spring in Gaia. | Random Item Shop | Yes |
| Chime | Required to enter the Mirage Tower. | Lefein (from NPC, must speak Lefeinish) | Yes |
| Crown |
Astos's Crown. If you talk to him with this in your possession, he will attack you. The Crown is required to explore the Castle of Ordeals if the "Early Ordeals" option is unchecked in the "Conveniences" tab of the randomizer program. |
Random Chest | Yes |
| Cube | Object used to activate the teleporter on the top floor of Mirage Tower. Required to enter the Floating Castle. | Waterfall Cave (from Robot) | Yes |
| Crystal | Matoya's Crystal. Can be traded to Matoya for an Herb. | Northwest Castle (Defeat Astos) | Yes |
| Floater (Levistone) | Stone used to unearth the airship. The airship is buried in the desert south of Crescent Lake. | Random Chest | Yes |
| Herb | Medicinal herb used to awaken the Prince of Elfland. | Matoya's Cave (from Matoya) | Yes |
| Key |
The Mystic Key. Allows you to enter locked doors. Locked Doors:
|
Elfland Castle (from the Prince, when awake) | Yes |
| Lute | Use to destroy the stone plate in the Temple of Fiends Revisited. | Coneria Castle (from Princess Sara, after rescue) | Yes |
| Oxyale | Substance which allows you to breathe underwater. Required to access the Sea Shrine. | Gaia (from Fairy, after using Bottle) | Yes |
| Rod | Used to remove the stone plate in the Earth Cave. | Sarda's Cave (from Sarda) | Yes |
| Ruby |
Preferred gem of the Titan. Can be traded to him for passage through the Titan's Cave. Can be a required item if:
|
Random Chest | Maybe |
| Slab | Artifact needed for Dr. Unne to teach Lefeinish to your party. | Random Chest | Yes |
| Tail | Rat's tail used to prove your courage. Give to Bahamut to upgrade character classes for your entire party. | Random Chest | No |
| TNT | Give to Nerrick in the Dwarf cave to build a canal. | Random Chest | Yes |
Notable Weapon Chart
| Weapon Name | Attack | Hit% | Crit Rate | Crit Rate (WS Off) | Element / Bonus | Effect on Use | Can Equip |
|---|---|---|---|---|---|---|---|
| Silver Sword | 23 | 15 | 10 | 16 | None | None | Fighter, Red Mage, Ninja |
| Flame Sword | 26 | 20 | 10 | 20 | Fire, + vs. Undead / Regen | None | Fighter, Red Mage, Ninja |
| Ice Sword | 29 | 25 | 10 | 21 | Ice | None | Fighter, Red Mage, Ninja |
| Sun Sword | 32 | 30 | 10 | 24 | + vs. Undead | None | Fighter, Red Mage, Ninja |
| Light Axe | 28 | 15 | 6 | 29 | + vs. Undead | Casts HRM2 | Fighter, Ninja |
| Heal Staff | 6 | 0 | 2 | 30 | None | Casts HEAL | White Mage, Ninja |
| Mage Staff | 12 | 10 | 2 | 31 | None | Casts FIR2 | Black Mage, Ninja |
| Defense | 30 | 35 | 10 | 32 | None | Casts RUSE | Knight, Red Wizard, Ninja |
| Vorpal | 24 | 25 | 60 | 34 | None | None | Knight, Red Wizard, Ninja |
| Thor Hammer | 18 | 15 | 2 | 36 | None | Casts LIT2 | Knight, White Wizard, Ninja |
| Bane Sword | 22 | 20 | 20 | 37 | None | Casts BANE | Knight, Red Wizard, Ninja |
| Katana | 33 | 35 | 60 | 38 | None | None | Ninja |
| Xcalber | 45 | 35 | 10 | 39 | All Elements | None | Knight |
| Masmune | 56 | 50 | 20 | 40 | None | None | All Classes |
Notable Armor Chart
| Armor Name | Defense | Evade Penalty | Element Resist | Effect on use | Armor Slot | Can Equip |
|---|---|---|---|---|---|---|
| Chain Armor | 15 | -15 | None | None | Body | Fighter, Red Mage, Ninja |
| Iron Armor | 24 | -23 | None | None | Body | Fighter, Ninja |
| Flame Armor | 34 | -10 | Ice | None | Body | Fighter, Ninja |
| Ice Armor | 34 | -10 | Fire | None | Body | Fighter, Ninja |
| Opal Armor | 42 | -10 | Lightning | None | Body | Knight |
| Dragon Armor | 42 | -10 | Fire, Ice, Lightning | None | Body | Knight |
| Silver Bracelet | 15 | -1 | None | None | Body | All Classes |
| Gold Bracelet | 24 | -1 | None | None | Body | All Classes |
| Opal Bracelet | 34 | -1 | None | None | Body | All Classes |
| White Shirt | 24 | -2 | Fire, Death | Casts INV2 | Body | White Wizard |
| Black Shirt | 24 | -2 | Ice, Time | Casts ICE2 | Body | Black Wizard |
| Flame Shield | 12 | 0 | Ice | None | Shield | Fighter, Ninja |
| Ice Shield | 12 | 0 | Fire | None | Shield | Fighter, Ninja |
| Opal Shield | 16 | 0 | Lightning | None | Shield | Knight |
| Aegis Shield | 16 | 0 | Poison/Stone | None | Shield | Knight |
| Buckler | 2 | 0 | None | None | Shield | Fighter, Thief, Red Mage |
| ProCape | 8 | -2 | None | None | Shield | All except Black Belt/Master |
| Heal Helmet | 6 | -3 | None | Casts HEAL | Helmet | Knight, Ninja |
| Ribbon | 1 | -1 | All Elements | None | Helmet | All Classes |
| Zeus Gauntlet | 6 | -3 | None | Casts LIT2 | Arms | Knight, Ninja, Red Wizard |
| Power Gauntlet | 6 | -3 | None | Casts SABR | Arms | Fighter, Ninja, Red Wizard |
| ProRing | 8 | -1 | Death | None | Arms | All Classes |
Elemental Resistance and Magic Defense
If a party member or enemy resists an element, spells of that element will deal half damage. If an enemy is weak to an element, damage spells will deal 1.5 times more damage.
Party members and enemies also have a hidden stat called Magic Defense (MDef). This stat is used in hit chance calculations for spells and enemy skills. For skills and spells which inflict status, hit chance determines if the spell actually hits the target. For damaging spells, hit chance determines whether the spell does normal damage or double damage.
Note that protection from the Death element does not mean all instant death spells are blocked. ProRings will save you from RUB and TOXIC, but you're still vulnerable to spells and abilities such as BANE (Poison/Stone), ZAP! (Time), and CRACK (Earth).
Notable Spells
The following spells are almost always useful. Depending on what else is available at that spell tier, it is recommended you consider purchasing the following spells before considering others. Please note that these are guidelines only! Your particular seed may play out differently than expected and your needs may vary.
| Spell Name | Magic Type | Targets | Description |
|---|---|---|---|
| ARUB | White | Party | Grants resistance to Death, Earth, and Status-elemental skills and spells to party. Lasts until the end of the battle. |
| BANE | Black | All Enemies | Poison/Stone elemental spell which instantly kills the enemy if it connects. |
| CUR4 | White | Single Ally | Heals single ally to full HP. If used in battle, will heal all status effects other than petrification and death. |
| EXIT | White | N/A | Teleports party outside of dungeon. |
| FADE | White | All Enemies | Deals 80-320 non-elemental damage. Enemy resistances are ignored by non-elemental damage, but Magic Defense still applies. |
| FAST | Black | Single Ally | Increases physical hit multiplier by 1. Does not stack with additional casts, but can be used to counteract the effect of SLOW. |
| FIR2 | Black | All Enemies | Hits all enemies for 30-120 fire damage. |
| FIR3 | Black | All Enemies | Hits all enemies for 50-200 fire damage. |
| HEL3 | White | Party | Heals the party for 48-96 HP. |
| HRM4 | White | All Enemies | Deals 80-320 non-elemental damage to Undead enemies. Ineffective against all other types of enemies. |
| ICE2 | Black | All Enemies | Hits all enemies for 40-160 ice damage. |
| ICE3 | Black | All Enemies | Hits all enemies for 70-280 ice damage. |
| INVS | White | Single Ally | Increases the physical evasion of the target by 40 points. Stacks with itself and other evasion spells. (RUSE, INV2) |
| INV2 | White | Party | Increases the physical evasion of the party by 40 points. Stacks with itself and other evasion spells. (RUSE, INVS) |
| LIF2 | White | Single Ally | Restores a dead party member to full health. Cannot be used in battle. |
| LIFE | White | Single Ally | Restores a dead party member to 1 health. Cannot be used in battle. |
| LIT2 | Black | All Enemies | Hits all enemies for 30-120 lightning damage. |
| LIT3 | Black | All Enemies | Hits all enemies for 60-240 lightning damage. |
| MUTE | White | All Enemies | Inflicts Silence on all enemies. |
| NUKE | Black | All Enemies | Deals 100-400 non-elemental damage to all enemies. Enemy resistances are ignored by non-elemental damage, but Magic Defense still applies. |
| QAKE | Black | All Enemies | Earth elemental spell which instantly kills the enemy if it connects. |
| RUSE | White | Self (Caster) | Increases the evasion of the caster by 80 points. Stacks with itself and other evasion spells. (INVS, INV2) |
| SABR | Black | Self (Caster) | Increases physical damage of the caster by 16 points and hit rate by 10 percent. |
| TMPR | Black | Single Ally | Increases physical damage of one party member by 14 points. |
| WALL | White | Single Ally | Gives a single ally resistance to all elements. Lasts until the end of battle. |
| WARP | Black | N/A |
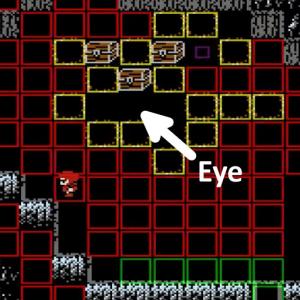
Teleports the party to the previous floor of the dungeon. Useful for full-clearing areas such as Sea Shrine and Floating Castle. In the Ice Cave, if you fall through the hole between three chests you can cast Warp to teleport on top of it. That way, you can open the chest protected by the Eye without needing to fight it. |
| ZAP! | Black | All Enemies | Time elemental spell which instantly kills the enemy if it connects. |
Encounter Mechanics
The encounter table contains all of the numbers from 0 to 255 in a random order. Every time you take a step in an area where encounters can occur, the game accesses the next number in the table and compares it to a threshold value. If the threshold value is larger than the "random" number, an encounter occurs and the next number of the table is loaded.
Area thresholds:
- Ship: 3
- Land Tile, Canoe: 10
- Temple of Fiends Revisited, Earth Floor: 9
- Temple of Fiends Revisited, Fire Floor: 10
- Temple of Fiends Revisited, Water Floor: 11
- Temple of Fiends Revisited, Wind Floor: 12
- Sky Palace, Top Floor: 24
- All other dungeons: 8
The ordering of the table is fixed in memory and does not change if you reset or power cycle the console. Saving and then resetting after an encounter allows you to skip that encounter. Power cycling resets the current location in the encounter table to its default location. This is useful if you are able to take a large number of steps before an encounter at the start of the game - after power cycling, you will be able to take that many steps again.
The order of the encounter table is re-shuffled if the option "RNG Table" is checked under the "Shuffle" tab of the randomizer program.
Source: tasvideos.org, gamefaqs.com
Unrunnable Battles
You cannot run from the following encounters:
| Formation | Location | Chance of Encounter |
|---|---|---|
| 2-4 Wizard | Marsh Cave Trap Tiles | N/A |
| Earth Cave B3 | 48/256 | |
| Earth Cave B4 | 48/256 | |
| 3-7 Wizard | Ice Cave B1 | 98/256 |
| 1 Earth | Earth Cave B5 | 4/256 |
| Earth Cave Trap Tiles | N/A | |
| 2-4 Earth | Temple of Fiends Revisited - Earth Floor | 60/256 |
| 1 Eye | Ice Cave B2 Trap Tile | N/A |
| Floating Castle 1F, 2F | 48/256 | |
| 1 FrGiant / 0-2 FrWolf | North and West of Onrac | 48/256 |
| Ice Cave B2 | 12/256 | |
| Ice Cave B3 | 24/256 | |
| 2 FrGiant / 2-6 FrWolf | Temple of Fiends Revisited 2F | 98/256 |
| 0-1 Cerebus, 1-2 WzOgre | Gurgu Volcano B3 | 24/256 |
| Gurgu Volcano B5 | 24/256 | |
| 1-3 Cerebus, 0-2 WzOgre | South of Onrac | 48/256 |
| 1-2 Fire | Gurgu Volcano B2, B3 | 4/256 |
| Gurgu Volcano B2 Trap Tiles | N/A | |
| Gurgu Volcano B5 | 24/256 | |
| 3-4 Fire | Temple of Fiends Revisited - Fire Floor | 12/256 |
| 1-4 ZomBull, 0-2 Troll | Lefein Peninsula | 96/256 |
| 1-3 ZomBull | Castle of Ordeals 2F | 96/256 |
| 1-3 ZombieD | Castle of Ordeals 2F, 3F | 4/256 |
| 2-4 ZombieD | Temple of Fiends Revisited 2F | 4/256 |
| 2-5 Ghost | Sea Shrine B2, B4 | 48/256 |
| 2-5 Ghost | Sea Shrine B2, B4 | 48/256 |
| 1-2 WzSahag, 7-8 R.Sahag | Sea Shrine B2, B4 | 48/256 |
| Sea Shrine B3 | 24/256 | |
| 1-3 Water | Sea Shrine B2 | 12/256 |
| Sea Shrine B4 Trap Tiles | N/A | |
| Sea Shrine B5 | 24/256 | |
| 3-6 Water | Temple of Fiends Revisited - Water Floor | 96/256 |
| 1 GasD | Waterfall Cave | 4/256 |
| 2-4 GasD | Temple of Fiends Revisited 3F | 120/256 |
| 1 BlueD | Mirage Tower 2F, 3F | 4/256 |
| Mirage Tower 3F Trap Tile | N/A | |
| 1-2 Worm | Temple of Fiends Revisited 1F | 96/256 |
| 3-4 Worm | Temple of Fiends Revisited - Wind Floor | 48/256 |
| 1-2 IronGOL | Temple of Fiends Revisited - Wind Floor | 4/256 |
You also cannot run from Boss fights. WarMECH is not considered a boss.
Source: AstralEsper's Final Fantasy Game Mechanics Guide
Strategies for Dangerous Battles
If you encounter a large group of enemies which have a powerful spell or ability (NUKE, NUCLEAR, SWIRL, etc.) have your mages cast powerful AOE magic while your physical damage dealers run. Even though nuking 7-9 enemies takes more time than successfully running, the penalty for failure is too high to leave to chance. Consider doing the same against a large group that has TRANCE, since getting stunlocked is a huge time sink.
Randomizer settings may require you to set up for a long battle when fighting the Four Fiends and Chaos. The following spells are the most useful buffs for your party:
- FAST: Doubles the number of hits a party member can get when attacking. Does not stack, but can be used to counteract SLOW.
- INV2: Boosts the evasion of each party member by 40 points, and can stack with itself and other evasion boosting spells. Evasion caps out at 255, so any cast beyond the sixth will not be beneficial.
- TMPR: Increases the attack power of a single ally by 14. Do not boost your attack power over 255 or you will overflow the value to 0.
- SABR: Increases the attack power of a single ally by 16 and boosts their hit percentage by 10%. Hit% is also capped at 255, but it is unknown if this value overflows as well. Most useful when cast by a Black Belt or Fighter holding the Power Gauntlet.
- WALL: Grants resistance to all elements to a single party member. Does the same thing as a Ribbon, but only for the duration of the battle.
- RUSE: Increases the evasion of the caster by 80 points. Three casts of this will push you to the evasion cap. This spell is cast when the Defense Sword is used as an item, allowing your frontline tank to boost their own agility.
- ARUB: Grants Earth, Status, and Death element resistance to the whole party. If you're running a seed without shuffled scripts and skills, this will block Chaos's use of the CRACK skill.
A good first round set-up is to have your physical damage dealer attack or use SABR (from the Power Gauntlet), have one of your mages cast FAST on them, and have another mage cast INV2 (or use the White Shirt). Depending on your party composition, you can have the fourth character augment your offense or defense as appropriate. For example, two casts of INV2 is useful when fighting Kraken and his 8 physical hits. Against Chaos, you might want to use WALL to defend against a powerful spell or skill.
Trap Tiles and Grinding
Final Fantasy is interesting in that it has so-called "trap" tiles, or tiles that trigger the same encounter every time you step on them. These fights are independent of the regular encounter mechanics. It is important to know where they are so you can avoid unnecessary fights, and if you are new to the game playing with maps open is a great idea. Here are some links to great maps sites for Final Fantasy:
However, since there are fights that can be predicted, we can use that knowledge to force fights when we want to gain experience. A common strategy is to let several (or all but one) character die and then use the last character (often a Black Belt, or more rarely a Fighter or something else) to repeatedly kill an easily-killable enemy over and over again for quick experience. Planning your escape after this grind can be tricky, so make sure you are prepared to finish what you've started!
Grinding is a common strategy if you have a black belt in your party due to how broken that class is at higher levels, but can be useful for 1-2 of any class to get higher HP levels to survive in the final dungeon of the game. Using a Ninja for SABR or using the Power Gauntlet on a Black Belt for a couple of turns and then killing a boss in 2-3 hits is a great way to end the game.
How and where you can grind will depend on how the enemy type you're trying to grind was randomized. If they rolled really high stats or a crazy ability like FIR3, you probably want to try somewhere else. While you can grind just about anywhere, below are the notable spots for enemies that are typically farmable without much trouble:
- Gurgu Volcano
- Ice Cave
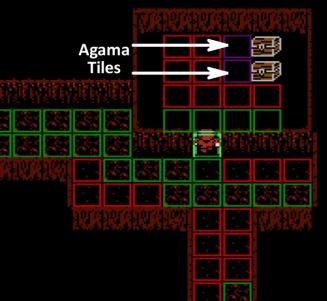
- Mirage Tower
There are 2 locations here that are useful: Agama and Red D. Agama is a classic grind spot, as it usually isn't much trouble to kill and has lower base stats. Red D can be tougher to kill, but depending on how it rolled it can be just as fast to kill, and is worth more experience.
There is only one enemy here worth farming: The EYE. The EYE has great experience and amazing gold, but is sort of out of the way, and after you finish your grind you have a bit of a trek to get walk out, with a couple of potentially unrunnable fights on the last floor of the Ice Cave. Honorary mention goes to the Frost D tile. You can consider grinding here if the EYE is not good to grind on your particular seed.
This location only really has one trap tile of note: The Blue D. This monster is probably the least desirable of the top 3 grind locations, but can provide a decent grind spot, and is accessible without too much danger.
Bug List
The current list of bugs to be fixed is located here. Of note:
- The XFER spell does nothing.
- When unarmed Black Belts level up, their defense is set to their current level. This can be fixed by opening the Armor screen.
- You can land on top of the desert caravan tile.
- You can only gain one level at a time at the end of a battle. If you receive enough EXP to level up more than once, you will level up again at the end of the next battle.
- The INT stat is not actually used for anything. For example, there is no damage penalty if a low-INT character casts a spell using an item.
- If you go take too many teleporters in the Castle of Ordeals, you risk softlocking the game.
Links